
Creating a Local WordPress Site Using XAMPP: A Comprehensive Guide(2023)
Creating a Local WordPress Site Using XAMPP: A Comprehensive Guide

At Technicalword, we understand the importance of having a local WordPress site that allows for easy development and testing before going live. In this article, we will provide you with a step-by-step guide on how to create a local WordPress site using XAMPP, a free and open-source software that allows you to run a web server and database server locally on your computer.
Step 1: Download and Install XAMPP

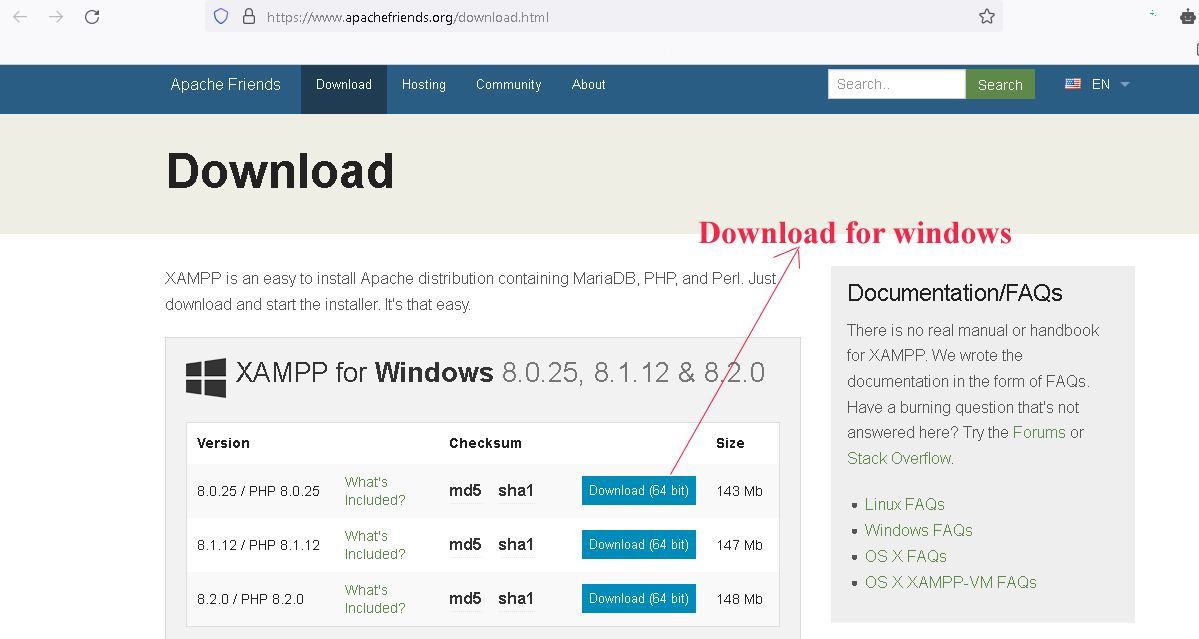
The first step to creating a local WordPress site using XAMPP is to download and install software on your computer. XAMPP is available for Windows, Mac, and Linux operating systems, so be sure to download the version that is compatible with your computer. this way you can xampp download
Once downloaded, double-click the installation file and follow the prompts to install XAMPP on your computer. During the installation process, you will be asked to select which components to install. Make sure to select Apache and MySQL as they are necessary for running a local WordPress site. xampp server can use ram of your pc more to fix problem do not open any other application in your system
Step 2: Start Apache and MySQL Servers

After installing XAMPP, you will need to start Apache and MySQL servers to run a local WordPress site. To do this, open the software’s Control Panel and click on the Start buttons next to Apache and MySQL.
Step 3: Create a Database

Next, you will need to create a database for your local WordPress site. To do this, open your web browser and navigate to http://localhost/phpmyadmin/. This will bring up the phpMyAdmin page where you can manage your databases.
Click on the Databases tab and enter a name for your database. Click on the Create button to create the database.
Step 4: Download and Install WordPress
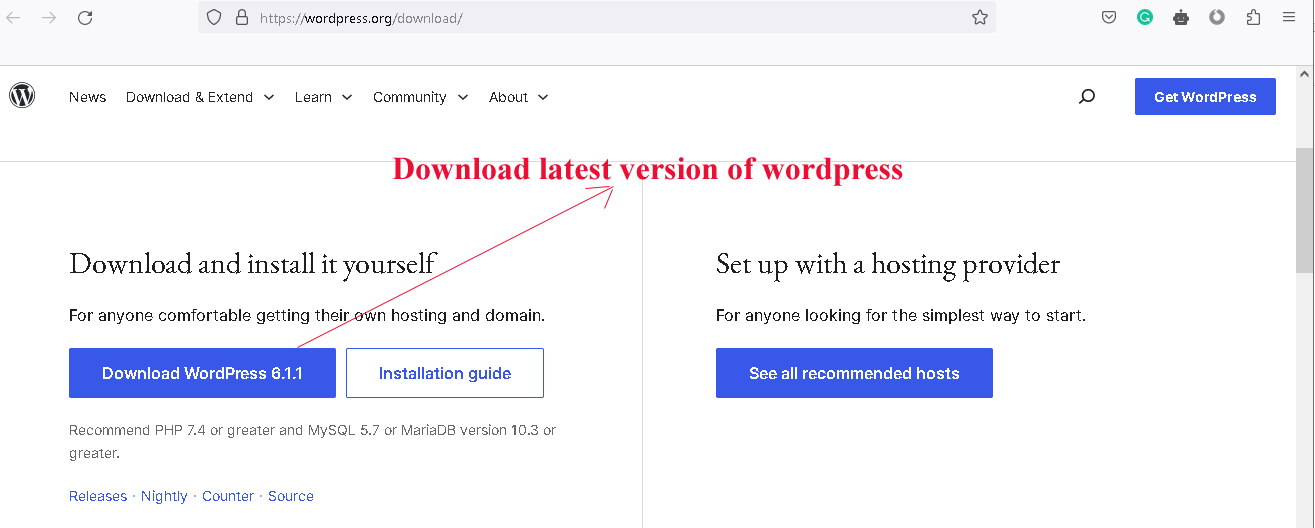
Now it’s time to download and install WordPress. You can download the latest version of WordPress from the official WordPress website (https://wordpress.org/download/).
Once downloaded, extract the WordPress files to the htdocs folder located in the XAMPP installation directory. Rename the extracted WordPress folder to your preferred name for your local WordPress site.

Step 5: Configure WordPress
After installing WordPress, you will need to configure it to work with your local server. To do this, open the wp-config.php file located in your local WordPress site’s root directory and edit the following lines:
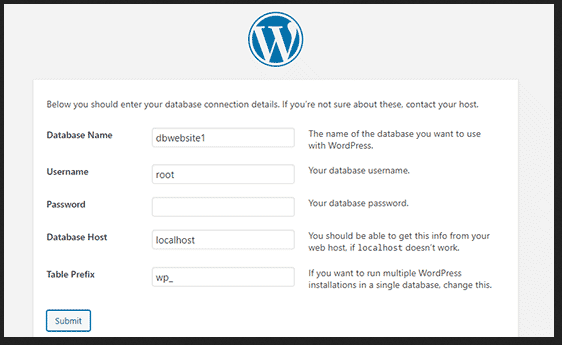
- define(‘DB_NAME’, ‘database_name_here’);
- define(‘DB_USER’, ‘username_here’);
- define(‘DB_PASSWORD’, ‘password_here’);
- define(‘DB_HOST’, ‘localhost’);
Replace the database_name_here, username_here, password_here, and localhost with the database name you created earlier, “root” for the username, leave the password blank, and localhost for the database host.
Step 6: Install WordPress
Now that WordPress is configured, it’s time to install it. To do this, open your web browser and navigate to http://localhost/[your-wordpress-folder-name]. This will bring up the WordPress installation page where you will need to enter the necessary details such as site title, username, and password.
Once completed, click on the Install WordPress button to install WordPress on your local server.
Step 7: Access Your Local WordPress Site

Congratulations! You have successfully created a local WordPress site using XAMPP. To access your site, simply open your web browser and navigate to http://localhost/[your-wordpress-folder-name]. If you want to know about basic plugins to install in your WordPress? the technical word gives you this information free of cost
Conclusion
Creating a local WordPress site using XAMPP is an essential step for any WordPress developer or website owner. With XAMPP, you can easily develop and test your website locally before going live, saving time and ensuring a smooth transition. Follow the step-by-step guide provided in this article to create your own local WordPress site using XAMPP.
FAQ
What is XAMPP for Windows?
XAMPP for Windows is a free and open-source web server solution that allows developers to easily create and test dynamic web applications locally on their Windows machines. It is a combination of several software components, including Apache, MySQL, PHP, and Perl, that work together to provide a complete web server environment.
1. Three important pieces of information about XAMPP for Windows are:
It includes Apache, MySQL, PHP, and Perl: These are the four essential components that make up XAMPP for Windows, and they allow developers to create, test, and deploy web applications on their local machines.
2. It is free and open-source: XAMPP for Windows is completely free to use, and its open-source nature means that developers can modify and customize it to suit their specific needs.
3. It is easy to install and use: XAMPP for Windows has a simple and intuitive installation process, and once installed, it can be easily configured and managed through a web-based control panel.
How do I install XAMPP for Windows?
To install XAMPP for Windows, follow these steps:
1. Download the latest version of XAMPP for Windows from the official Apache Friends website.
2. Run the downloaded installer and follow the on-screen instructions to complete the installation process.
3. Choose which components you want to install, such as Apache, MySQL, PHP, and Perl.
4. Once the installation is complete, start the XAMPP Control Panel and start the Apache and MySQL services.
5. Open a web browser and navigate to http://localhost to verify that XAMPP for Windows is installed and running correctly.
Three important pieces of information about installing XAMPP for Windows are:
1. Choose which components to install: XAMPP for Windows includes several software components, so it’s important to choose which ones you need for your particular project.
2. Start the Apache and MySQL services: XAMPP for Windows installs Apache and MySQL as Windows services, which means they will start automatically whenever you boot your machine. However, you may need to manually start them using the XAMPP Control Panel if they are not running.
3. Verify that XAMPP for Windows is installed correctly: Once you’ve installed XAMPP for Windows, it’s a good idea to verify that it’s working correctly by navigating to http://localhost in your web browser.

My name is sonu singh. I have experience in WordPress, SEO and digital marketing I worked for many companies according to my working way from which company growth boost like a rocket. here I am sharing my work experience comes from knowledge